All you need to
know about colour profiles
Coated papers
| ISO class | Printing technique | Type | Moderna code | Fogra | File | |
|---|---|---|---|---|---|---|
| PT 1/2 | Heatset/sheetfed | WF | Type 1 / Type 2 | FOGRA 51 | PSO Coated v3 | Download |
| PT 3 | Heatset/sheetfed | If after WF, LWC, WC | Type 3 | FOGRA 45 | PSO_LWC_lmproved | Download |
| MFC | Heatset | MF Coated | Type 6 | FOGRA 41 | PSO_MFC_Paper | Download |
Uncoated papers
| ISO class | Printing technique | Type | Moderna code | Fogra | File | |
|---|---|---|---|---|---|---|
| PT 4 | Heatset/sheetfed | Woodfree offset | Type 4 | FOGRA 52 | PSO Uncoated v3 | Download |
| Improved newsprint | Heatset | Improved newsprint | Type 5 | FOGRA 48 | PSO INP Paper | Download |
| Newsprint | Heatset | Newsprint | Type 7 | FOGRA 42 | PSO_SNP_paper | Download |
| SC Paper | Heatset | SCA/SCB | Type S | FOGRA 40 | SC Paper | Download |
What are colour profiles?
Colour profiles have been developed to ensure that printing results using different paper, printers or presses are as similar or equivalent as possible. A few years ago, the ICC (International Color Consortium) adapted, improved and made available online the colour profile standards for sheet-fed and heatset web printing. These can be readily downloaded and installed.
Colour profiles are not installed by default on your Mac or in Windows on your PC. You can install colour profiles into your page layout application.
The most commonly used colour profiles for printing are those for coated and uncoated paper types (PSC coated and PSO uncoated). These are made available online by the ECI (European Colour Initiative) and can be downloaded as zip files. Because we are currently working with version 3 of these colour profiles, they are referred to as “PSO coated v3” and “PSO uncoated v3”. They are also referred to as FOGRA 51 and FOGRA 52.
For heatset web printing, we recommend using different colour profiles. For example, even more profiles are applicable, such as those for newsprint and wood-containing papers. Please contact your ordermanager for more information.
How to make a print-ready PDF > Print-ready PDF is PDF/X
Your layout is done, and you want to create a print-ready PDF. Go to the “file” menu and select “export”.
To create a standard PDF which is also effectively a print-ready PDF (PDF/X), we recommend the magazine standard. You can set this manually in the Adobe packages using the link below.
Automatic PDF preset for a print-ready PDF
You can also load the default magazine settings automatically via this link http://www.medibelplus.be/en/downloads/index.jsp. Then you will find all PDF settings under the name MagazineAds_1v4_IND4. Once these PDF/X settings have been made, you can change paper to your printing paper under the ‘Output’ tab (See colour profiles for the right paper)

Manually check settings
You can go through all the settings at the following link: http://www.medibelplus.be/pdf/magazine/MagazineAds_1v4_IND4.pdf
Adjusting the default colour profile for the magazine setting
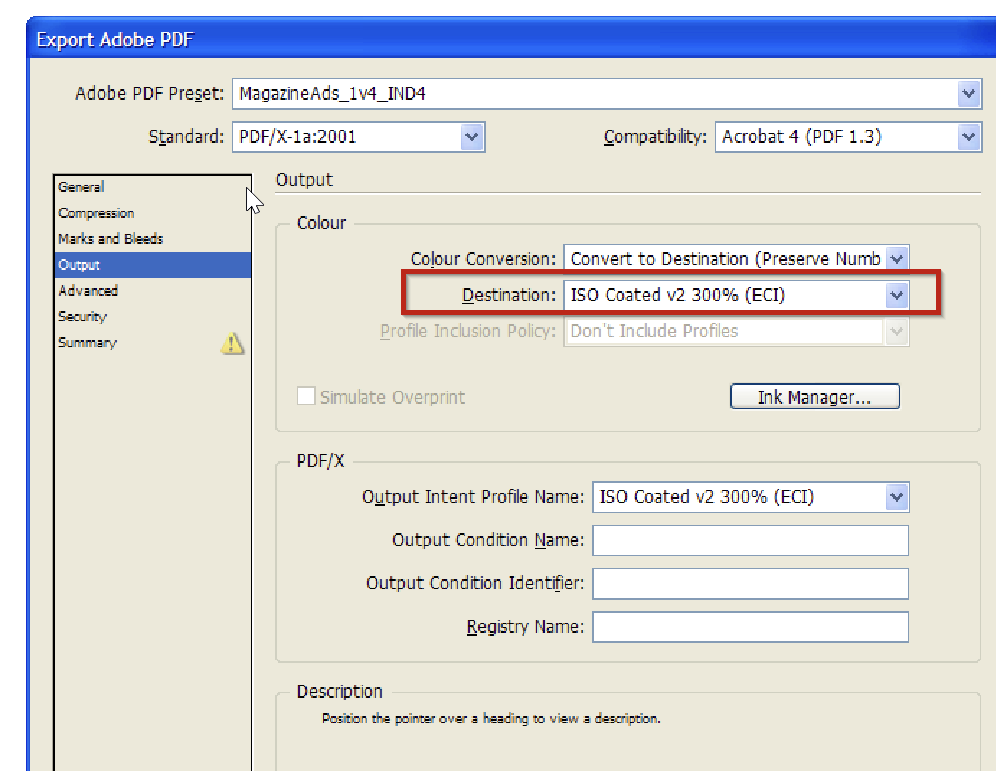
The default colour profile is set to ISO COATED V2 300%. You can change this to a different colour profile from the table.
How to install a printing profile in Windows
- Download the .zip file from the table above, and open it in the extracted folder.
- Click the right mouse button and go to “install profile”.
- Confirm by clicking the left mouse button.
- You can also copy the files manually and paste them into the “colour” folder: WINDOWS\system32\spool\drivers\color
How to install a printing profile in Mac OS
Download the .zip file from the link above, and open it in the extracted folder. Copy the file and add it to /library/colorsync/profiles or in /user/(username)/library/colorsync/profiles
If you are unable to open the Library folder, go to the menu bar for “finder”, click on “go to” and then press the Alt key. Then select “library” and go to the folder “colorsync” and then to “profiles”.
How to install colour settings in InDesign
Once you have installed the colour profiles in the operating system, it is best to restart your application so that the colour profiles are enabled.
You record the colour setting in InDesign by defining the colour profiles as workspace colours. This is done by going to the menu and selecting “colour setting” under “edit”.
Adjust the settings as follows:
- Settings : users defined in advanced mode
- Workspace colour:
- RGB: Adobe RGB or sRGB
- CMYK: PSO Uncoated v3
- Colour management:
- Preserve RGB embedded profiles
- Preserve CMYK values
InDesign automatically saves and retains these settings for future jobs.
You can also define colour profiles individually for each file. This is the best way to proceed, because different colour profiles are needed for different printing presses or paper types. You choose the required colour profile in the PDF export window.
How do you export a PDF from InDesign with the correct settings/colour profiles?
- To export a print-ready PDF from InDesign, go to “file” then “export”. Choose the Adobe PDF file format and save.
- To export the PDF, click on “output” then choose option “convert to target profile”, with the aim of creating a print-ready PDF including colour profile.
- In the export dialogue box, you will find important settings for creating print-ready PDFs. Follow the instructions below to avoid problems with the exposure of your PDFs.
Export-dialoguebox
Your layout is done, and you want to create a print-ready PDF. Go to the “file” menu and select “export”. To create a standard PDF which is also effectively a print-ready PDF (PDF/X), we recommend the magazine standard with colour profile V2 300%. You can set this manually in the Adobe packages using the following link: http://www.medibelplus.be/pdf/magazine/MagazineAds_1v4_IND4.pdf
- Under the “general” tab :
select PDF standard PDF/X-4:2010. Under compatibility, Acrobat 7 and PDF 1.6 is then displayed
- Under the “compression” tab :
The InDesign presets are usually fine. Images should generally be 300 dpi. This value gives very good, clear printing results.
- Under the “marks & bleed” tab :
This is where you define the bleed settings for the document. Allow at least 3 mm for this (as was also allowed for in your layout)
- Under the “output” tab :
Please note, these settings are very important for correct colour output. Under “colour conversion”, select the option “convert to target (keep numbers)” and select the correct colour profile from our list as the target. (see part 1) Please contact us if you are unsure about which ICC colour profile to choose
- Under the “advanced” tab :
PDF standard PDF/X-4:2010 enables transparencies. No other adjustment is needed. - Under the “summary” tab :
Not applicable. Don’t assign passwords to your PDFs
Finally, confirm settings by clicking on “export” and create a print-ready PDF.
Save your settings if you need these PDFs regularly.
You can also load the default magazine settings automatically using the following link http://www.medibelplus.be/en/medibel/pdfxplus/pdf_settings.jsp and you will then find all PDF settings under the name MagazineAds_1v4_IND4. Once these PDF/X settings have been made, you can change paper to your printing paper under the ‘Output’ tab.
How to install colour settings in Photoshop
You can edit images in Photoshop based on the colour profiles. This means you can see on your screen what effect the paper will have on your printing output and you can make the necessary colour corrections.
- If you want to view your image editing based on the colour profiles in Photoshop, go to “file”, then “save as”
- click on “file then “save as”. Select the file format Photoshop PDF, name the file and click “save”.
- In the next dialogue box click on “output”. In the “colour” field, under “colour conversion”, select option “convert to target profile”. Under “target” you then have the option to select the relevant colour profile (e.g. coated v3 or uncoated v3).